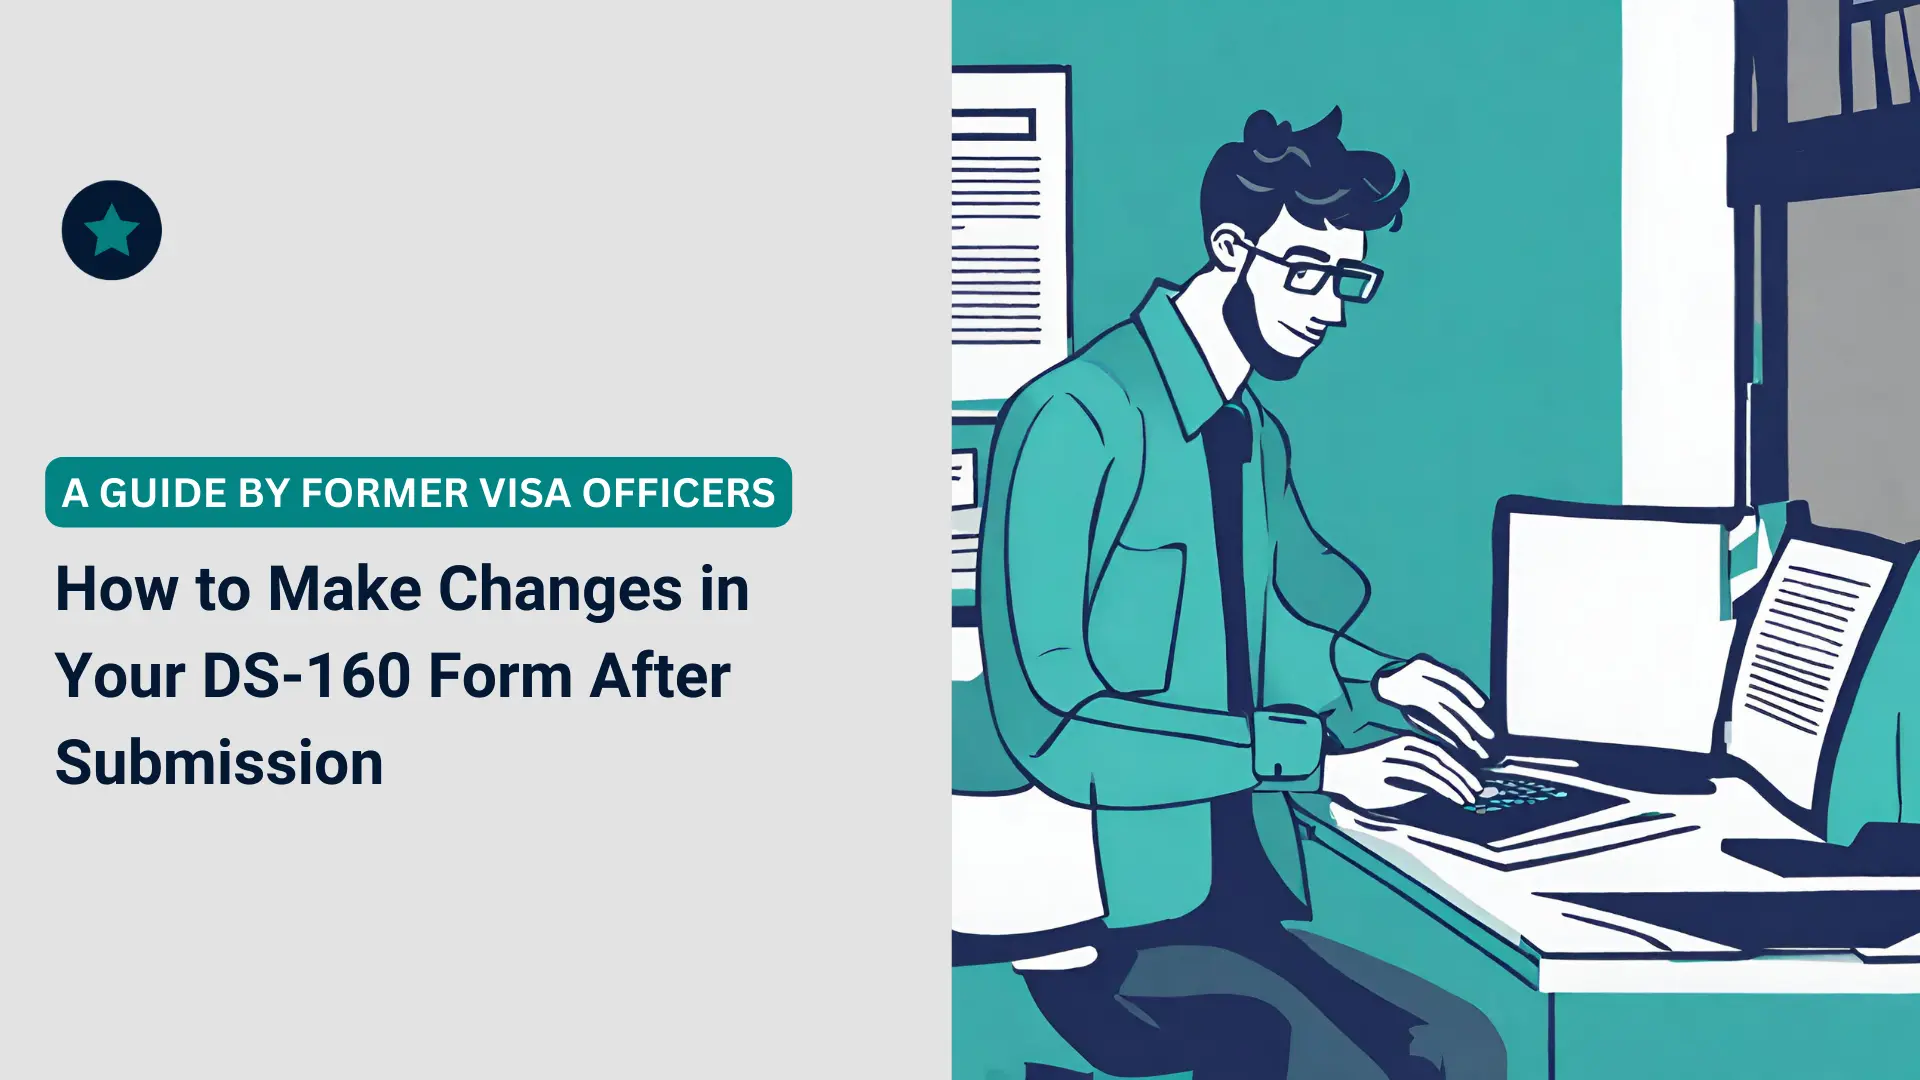
Are you planning to apply for a U.S. visa soon? If so, you may have heard of the DS-160 form, which is an online non-immigrant visa application form that you need to fill out and submit before your visa interview. The DS-160 form is a crucial part of your visa application process, as it contains important information about your personal, educational, and professional background, as well as your travel plans and purpose of visit to the U.S. The information you provide in the DS-160 form will be used by the U.S. consular officer to determine your eligibility and suitability for the visa category you are applying for.
However, what if you realize that you have made a mistake or need to update some information in your DS-160 form after you have submitted it? For example, you may have entered a wrong date of birth, misspelled your name, changed your passport number, or modified your travel itinerary. Or maybe you just want to make some minor changes or corrections to improve your chances of getting approved for the visa. Whatever the reason, you may be wondering if it is possible to make changes in your DS-160 form after submission, and if so, how to do it without affecting your visa application process.
If you are looking for answers to these questions, then you have come to the right place. In this blog post, we will provide you with a clear and easy-to-follow guide on how to make changes in your DS-160 form after submission using two efficient methods. These methods will allow you to reuse the information from your old application and create and submit a newly updated DS-160 form without having to start from scratch.
But before we get into the details of these methods, let us introduce ourselves. We are Udeti Visa, a U.S. visa consultation service that helps applicants prepare for their visa interviews. Our founder and lead consultant is Ms. Yvette Bansal, a former U.S. consular officer who has five years of experience in interviewing and adjudicating thousands of U.S. visa applications and a total of 11 years working for the U.S. Government. She knows the system and can provide you with expert advice and guidance on how to ace your visa interview and avoid common pitfalls.
The main purpose and goal of this blog post is to help you make changes in your DS-160 form after submission using two efficient methods that will save you time and hassle. By following these methods, you will be able to update your DS-160 form with the latest and most accurate information and ensure that it matches your passport, travel documents, and visa category. This will not only make your visa application process smoother and faster, but also increase your chances of getting approved for the visa.
So, without further ado, let us dive into the two methods on how to make changes in your DS-160 form after submission.
Need to speak to a former U.S. consular officer?
How to Create a New Application Using the Retrieve an Application Option
The first method on how to make changes in your DS-160 form after submission is to use the Retrieve an Application option in the CEAC system. This option allows you to access your original application that you have submitted within the last 30 days and create a new application based on it. You can then edit and update the new information in the new application and submit it as a replacement for the old one. This method is useful if you have made major or multiple changes in your DS-160 form, such as changing your visa category, travel dates, or contact information.
To use this method, follow these steps to change the DS-160 after booking your appointment:
– Step 1: Log in to the CEAC system. You can access the CEAC system by visiting this link. You will see a screen like this:
– Step 2: Select the Retrieve an Application option. You will see a screen like this:
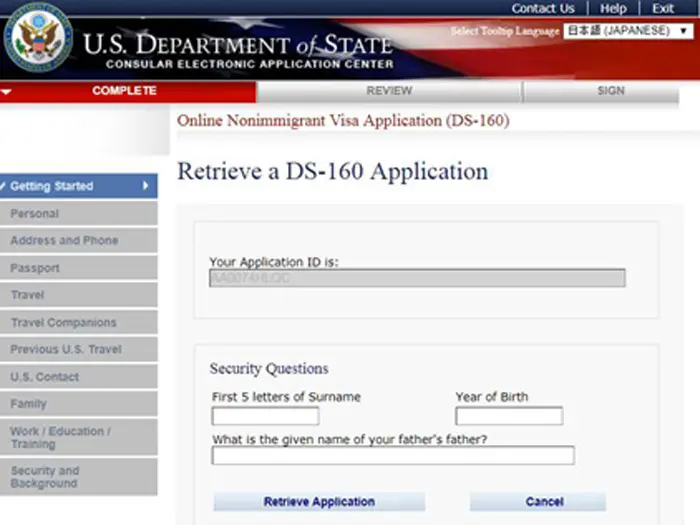
– Step 3: Enter your application ID number. You can find your application ID number on the top right corner of your confirmation page that you have printed or saved after submitting your original DS-160 form. It is a 10-digit alphanumeric code that starts with “AA”. You will see a screen like this:

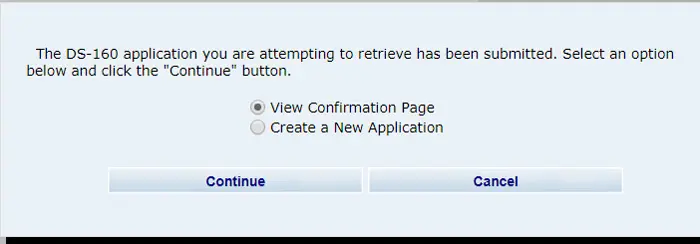
– Step 4: Select the Create a New Application option. You will see a screen like this:
– Step 5: Edit and update the new information in the new application. You can now make any changes or corrections that you need in your DS-160 form. You can navigate through different sections of the form using the menu on the left side of the screen. You can also use the Previous and Next buttons at the bottom of each page to move back and forth between pages. Make sure to review and verify all the information that you enter in the form before moving to the next page.
– Step 6: Submit the new application. Once you have completed and checked all the sections of the form, you can submit the new application by clicking on the Sign and Submit Application button at the end of the form.
You will need to enter some security information, such as your passport number, date of birth, and country of citizenship, to confirm your identity and consent to submit the application. You will also need to answer some security questions that you have chosen when you started your original application. After that, you will see a confirmation page like this:
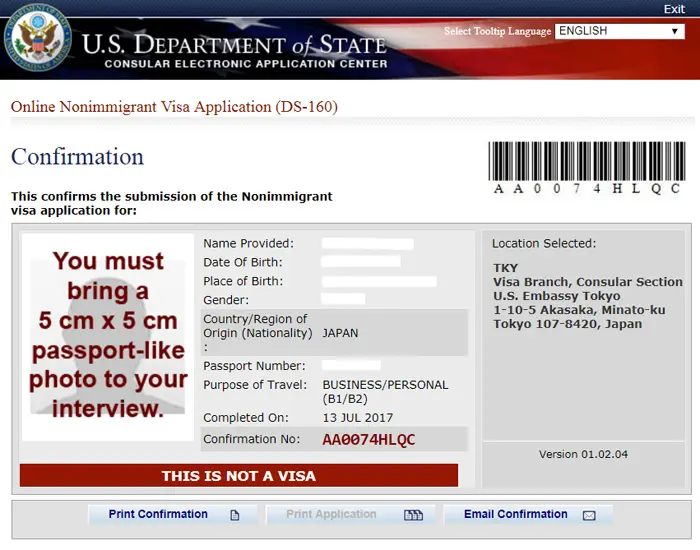
You have successfully submitted your newly updated DS-160 form using the Retrieve an Application option. You should print or save this confirmation page, as you will need it for your visa interview.
Note that this method will generate a new confirmation page with a different barcode from your original one. This means that you have created a new DS-160 form with a new application ID number, which will replace your old DS-160 form with your old application ID number. The U.S. consular officer will use this new barcode to retrieve your new DS-160 form during your visa interview.
This is how you can create a new application using the Retrieve an Application option in the CEAC system. This method is easy and convenient, as it allows you to reuse most of the information from your old application and make changes only where necessary. However, if you have already booked your visa appointment or paid your MRV fee using your old DS-160 form, there is one more thing that you need to do before your visa interview, which we will explain later in this blog post.
How to Upload a Previously Saved Application Using the DAT File
The second method on how to make changes in your DS-160 form after submission is to use the Upload a Previously Saved Application option in the CEAC system. This option allows you to upload a DAT file that contains the information from your original application that you have saved to a drive or a hard disk, and make minor changes to it before submitting it as a replacement for the old one. This method is useful if you have saved the DAT file from your original application and want to make small or few changes in your DS-160 form, such as correcting a typo, adding a middle name, or changing a phone number.
To use this method, you need to follow these steps:
– Step 1: Log in to the CEAC system. You can access the CEAC system by visiting this link.
– Step 2: Select the Upload a Previously Saved Application option.
– Step 3: Upload the DAT file from your drive or hard disk. You will need to browse and select the DAT file that contains the information from your original application that you have saved to your drive or hard disk. The DAT file is a binary file with the extension “.dat” and is usually named after your application ID number. For example, if your application ID number is “AA12345678”, your DAT file will be named “AA12345678.dat”.
– Step 4: Make the necessary changes in the uploaded application.
You can now make any changes or corrections that you need in your DS-160 form. You can navigate through different sections of the form using the menu on the left side of the screen. You can also use the Previous and Next buttons at the bottom of each page to move back and forth between pages. Make sure to review and verify all the information that you enter in the form before moving to the next page.
– Step 5: Submit the newly updated application. Once you have completed and checked all the sections of the form, you can submit the newly updated application by clicking on the Sign and Submit Application button at the end of the form.
You will need to enter some security information, such as your passport number, date of birth, and country of citizenship, to confirm your identity and consent to submit the application. You will also need to answer some security questions that you have chosen when you started your original application.
You have successfully submitted your newly updated DS-160 form using the Upload a Previously Saved Application option. You should print or save this confirmation page, as you will need it for your visa interview.
Note that this method will also generate a new confirmation page with a different barcode from your original confirmation page. This means that you have created a new DS-160 form with a new application ID number, which will replace your old DS-160 form with your old application ID number. The U.S. consular officer will use this new barcode to retrieve your new DS-160 form during your visa interview.
This is how you can upload a previously saved application using the DAT file in the CEAC system. This method is also easy and convenient, as it allows you to make minor changes in your DS-160 form without having to fill out the entire form again. However, if you have already booked your visa appointment or paid your MRV fee using your old DS-160 form, there is one more thing that you need to do before your visa interview, which we will explain in the next section of this blog post.
What to Do If You Have Already Booked Your Visa Appointment or Paid Your MRV Fee Using the Original DS-160 Form
The methods we explained in the previous sections will help you make changes to your DS-160 form after submission and generate a new confirmation page with a new barcode. However, if you have already booked your visa appointment or paid your MRV fee using your original DS-160 form, you might wonder how changing the DS-160 after booking an appointment will affect your application. In such cases, there is one more step you need to take before your visa interview: present both the confirmation pages from the new and original DS-160 forms during your appointment.
Why do you need to do this? Because when you book your visa appointment or pay your MRV fee, you are required to enter your application ID number from your original DS-160 form. This application ID number is linked to your visa appointment or payment record in the U.S. embassy or consulate’s system. If you submit a new DS-160 form with a new application ID number, the U.S. consular officer will not be able to access your visa appointment or payment record using the new barcode on your confirmation page. This may cause confusion or delay in your visa application process.
Therefore, to avoid any problems or misunderstandings, you need to bring both the confirmation pages from the new and original DS-160 forms to your visa interview. You should show both the confirmation pages to the U.S. consular officer and explain why you have submitted a new DS-160 form after booking your visa appointment or paying your MRV fee. You should also be prepared to answer any questions that the U.S. consular officer may have about the changes that you have made in your DS-160 form.
Here are some tips on how to explain to the U.S. consular officer the changes and the need for a newly updated DS-160 form:
- Be honest and polite. Do not lie or hide anything from the U.S. consular officer. Explain clearly and respectfully why you have made changes in your DS-160 form after submission and how they affect your visa application.
- Be specific and concise. Do not give vague or irrelevant answers. Focus on the main changes that you have made in your DS-160 form and how they relate to your travel plans and purpose of visit to the U.S.
- Be consistent and coherent. Do not contradict yourself or give conflicting information. Make sure that the information that you provide in your new DS-160 form matches with your passport, travel documents, and visa category.
- Be prepared and confident. Do not panic or get nervous. Practice and rehearse your answers before your visa interview. Have all the supporting documents and evidence ready to show to the U.S. consular officer if needed.
Here are some examples of possible interview questions and answers related to this scenario:
- Question: Why did you submit a new DS-160 form after booking your visa appointment? Answer: I submitted a new DS-160 form because I realized that I had made a mistake in my original DS-160 form. I had entered my name as “John Smith” instead of “John David Smith”, which is my full name as shown on my passport. I wanted to correct this error and make sure that my name matches with my passport.
- Question: Why did you submit a new DS-160 form after paying your MRV fee? Answer: I submitted a new DS-160 form because I had changed my travel dates after paying my MRV fee. I had originally planned to travel to the U.S. from June 1st to June 15th, but due to some personal reasons, I had to postpone my trip to July 1st to July 15th. I wanted to update this information and make sure that my travel dates are accurate.
- Question: Why did you change your visa category from B1/B2 to F1 in your new DS-160 form? Answer: I changed my visa category from B1/B2 to F1 in my new DS-160 form because I had received an admission offer from a U.S. university after submitting my original DS-160 form. I had originally applied for a B1/B2 visa for tourism purposes, but now I want to pursue higher education in the U.S. I wanted to change my visa category and make sure that it reflects my current situation and intention.
This is what you need to do if you have already booked your visa appointment or paid your MRV fee using your original DS-160 form before making changes in it using one of the methods that we have explained in this blog post. By presenting both the confirmation pages from the new and original DS-160 forms at your visa interview and explaining the changes and the need for a newly updated DS-160 form, you will be able to avoid any confusion or delay in your visa application process and increase your chances of getting approved for the visa.
We hope that this blog post has helped you understand how to make changes in your DS-160 form after submission using two efficient methods and what to do if you have already booked your visa appointment or paid your MRV fee using your original DS-160 form. If you have any questions or doubts, or if you need more guidance or assistance, please feel free to contact us at Udeti Visa. We are a U.S. visa consultation service that helps applicants prepare for their visa interviews. Our founder and lead consultant is Ms. Yvette Bansal, a former U.S. consular officer who has over 10 years of experience in interviewing and adjudicating thousands of U.S. visa applications from various countries. She can provide you with expert advice and guidance on how to ace your visa interview and avoid common pitfalls.
To contact us or book a consultation session with us, please click here. We look forward to hearing from you and helping you achieve your dream of traveling to the U.S.
Conclusion
In this blog post, we have shown you how to make changes in your DS-160 form after submission using two efficient methods: the Retrieve an Application option and the Upload a Previously Saved Application option. These methods will help you update your DS-160 form with the latest and most accurate information and ensure that it matches your passport, travel documents, and visa category. We have also explained what to do if you have already booked your visa appointment or paid your MRV fee using your original DS-160 form before making changes in it. By following these steps, you will be able to avoid any confusion or delay in your visa application process and increase your chances of getting approved for the visa.
Thank you for reading this blog post and for choosing Udeti Visa as your U.S. visa consultation service. Please share your feedback or questions in the comments section below. We would love to hear from you and answer any queries that you may have. Have a great day and happy travels!
(This blog post was written by Yvette Bansal, former consular officer & Kausar Shaikh, Content Strategist.)
DISCLAIMER:
This blog does not endorse or advocate for any illegal activities. All content presented here is intended for educational purposes only. The viewpoints expressed do not constitute legal advice and are solely based on the writer’s opinions and experiences. Please use the information provided responsibly. Any advice given is of a general nature and should be applied to your specific circumstances with caution and consideration.
Copyright © 2025 UDETI LLC. All rights reserved.